_┓_
‹‹ ( ´ ω ` ) ››
=〔∪ ̄ ̄〕
月別アーカイブ: 2018年5月
独創アプリ開発日記 222日目 ブッブブ- ブッブブ-
♪ /\/ \ ブッブブ- ブッブブ-
♪ \ \
◎\ / ブッブブッブ ブ-
\ \
◎\/
独創アプリ開発日記 221日目 はみがきじょうずかな?
\うえの歯────!/
∧ _ ∧ ∧ ∧
( ・∀・/’) (,゚Д゚∩
と/ ノ ⊂ /
(´ _ 〈 | (~
し’ ヽ,_,) iノ`\)
独創アプリ開発日記 220日目 友愛
ノ´⌒ヽ,,
γ ⌒´ ヽ,
/ / “”⌒ ⌒ \ )
i/ ⌒ ⌒ ヽ )
!゙ (・ )` ´( ・)i/
| (__人_) |
\ `ー’ /
/ \
先日赤坂の通りを歩いていたら、すれ違いざまに怖い形相で「ルーピー」と叫んで立ち去った方がいた。
独創アプリ開発日記 219日目 ポッポ
/ |ミ パカッ
/ | ミ
| |
\ | スカッ
\|_______
i/ ⌒ ⌒ ヽ )
!゙ (・ )` ´( ・)i/
| (__人_) |
\ `ー’ /
/ \
独創アプリ開発日記 218日目 環境に依存しないWindow
ここまでで、C#によるOpenGLの開発環境が整いました。
今回は、GameWindowという、Mac/Linux/Windowsのいずれの環境でも動作するウィンドウ表示のコードを書きたいと思います。
このブログでの実際の開発はUbuntu上で進める予定ですが、Macや憎っくきWindows上でも開発可能な想定です。
using System;
using OpenTK;

namespace FloatingIsland
{
    class FloatingIsland
    {
        static void Main(string[] args)
        {
            GameWindow gw = new GameWindow();
            gw.Run();
        }
    }
}
これだけ!”FloatingIsland”は私が開発しようとしている新しいアプリ名です。
実行したら以下のエラーが出ました。’gbm’がロード出来ないようです。
例外が発生しました: CLR/System.TypeInitializationException
An unhandled exception of type 'System.TypeInitializationException' occurred in OpenTK.dll: 'The type initializer for 'OpenTK.DisplayDevice' threw an exception.'
 Inner exceptions found, see $exception in variables window for more details.
 Innermost exception 	 System.DllNotFoundException : Unable to load DLL 'gbm': The specified module or one of its dependencies could not be found.
 (Exception from HRESULT: 0x8007007E)
   at OpenTK.Platform.Linux.Gbm.CreateDevice(Int32 fd)
   at OpenTK.Platform.Linux.LinuxFactory.SetupDisplay(String gpu, IntPtr& gbm_device, IntPtr& egl_display)
   at OpenTK.Platform.Linux.LinuxFactory.CreateDisplay(IntPtr& gbm_device, IntPtr& egl_display)
   at OpenTK.Platform.Linux.LinuxFactory.get_gpu_fd()
   at OpenTK.Platform.Linux.LinuxFactory.CreateDisplayDeviceDriver()
   at OpenTK.DisplayDevice..cctor()
GBMとは:
Generic Buffer Management(GBM)は、Mesaに関連付けられたグラフィックスレンダリング用のバッファを割り当てるためのメカニズムを提供するAPIです。
Mesaとは:
Mesa3DとMesa 3D Graphics Libraryとも呼ばれるMesaは、OpenGL、Vulkanなどの仕様のオープンソースデバイスドライバとソフトウェア実装です。 Mesaは、これらの仕様をさまざまなベンダー固有のグラフィックハードウェアドライバに変換するクロスランゲージ、クロスプラットフォーム(主にBSDおよびLinux)の標準APIを実装しています。
‘gbm’を入れるには以下のコマンドを叩きます。
$ sudo apt-get install libgbm-dev
再度実行すると、またエラーが出ました。次は’libEGL.dll’がロード出来ないとのことです。
例外が発生しました: CLR/System.TypeInitializationException
An unhandled exception of type 'System.TypeInitializationException' occurred in OpenTK.dll: 'The type initializer for 'OpenTK.DisplayDevice' threw an exception.'
 Inner exceptions found, see $exception in variables window for more details.
 Innermost exception 	 System.DllNotFoundException : Unable to load DLL 'libEGL.dll': The specified module or one of its dependencies could not be found.
 (Exception from HRESULT: 0x8007007E)
   at OpenTK.Platform.Egl.Egl.GetDisplay(IntPtr display_id)
   at OpenTK.Platform.Linux.LinuxFactory.SetupDisplay(String gpu, IntPtr& gbm_device, IntPtr& egl_display)
   at OpenTK.Platform.Linux.LinuxFactory.CreateDisplay(IntPtr& gbm_device, IntPtr& egl_display)
   at OpenTK.Platform.Linux.LinuxFactory.get_gpu_fd()
   at OpenTK.Platform.Linux.LinuxFactory.CreateDisplayDeviceDriver()
   at OpenTK.DisplayDevice..cctor()
EGLとは:
EGLは、KhronosレンダリングAPI(OpenGL、OpenGL ES、OpenVGなど)と基本的なネイティブプラットフォームのウィンドウシステムとの間のインターフェイスです。 EGLはグラフィックス・コンテキスト管理、サーフェス/バッファー・バインディング、レンダリング同期を処理し、「他のKhronos APIを使用して高性能で高速化された混合モードの2Dおよび3Dレンダリング」を可能にします。EGLは非営利の技術コンソーシアムKhronos グループによって管理されています。
Khronosとは:
Khronos Groupは、アメリカの非営利団体。 様々なプラットフォームやデバイスの上で動作する、並列計算やグラフィックス、メディア用アプリケーションプログラミングインタフェース (API) のロイヤリティーフリーでオープンな標準規格を作成することを目的としている技術コンソーシアムである。
Khronosの策定する代表的な規格に、3DCG向けAPIであるOpenGL、GPGPUなどのヘテロジニアス・コンピューティング向けAPIであるOpenCLなどがある。
KhronosのメンバーはKhronosの策定するAPI仕様の開発に参加することができ、公開前の投票権を持ち、また(自身のプラットフォームやデバイスでそれらの規格を実装するための)規格草案および規格適合性試験への早期アクセスを通じて自身のプラットフォームおよびアプリケーションの提供を早めることができる。
以下のコマンドを叩きます。
sudo apt-get install libegl1-mesa-dev
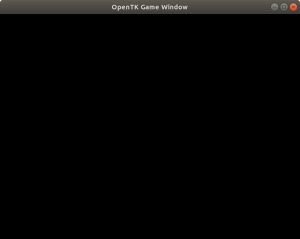
実行すると以下のようなウィンドウが表示されます。Ubuntuで実行していますが、MacやWindowsでも同じコードで動作します。
独創アプリ開発日記 217日目 Ubuntu18.04LTSにグラボドライバインストール
NVIDIAのサイトから対応したドライバ探してきて、コマンド打ってインストールトラブってアンインストールを繰り返し、まる3日かかりました。
いや違いました3秒でした。
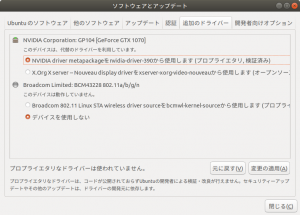
「ソフトウェアとアップデート」画面の「追加のドライバー」で、使っているグラボを認識し、対応したドライバーを自動で見つけてくれました。
NVIDIAのドライバをラジオボタンで選択して「変更の適用」をクリックしました。
ドライバ適用後のOpenGLバージョンは以下のとおりです。
$ glxinfo | grep version
server glx version string: 1.4
client glx version string: 1.4
GLX version: 1.4
OpenGL core profile version string: 4.6.0 NVIDIA 390.48
OpenGL core profile shading language version string: 4.60 NVIDIA
OpenGL version string: 4.6.0 NVIDIA 390.48
OpenGL shading language version string: 4.60 NVIDIA
OpenGL ES profile version string: OpenGL ES 3.2 NVIDIA 390.48
OpenGL ES profile shading language version string: OpenGL ES GLSL ES 3.20
    GL_EXT_shader_implicit_conversions, GL_EXT_shader_integer_mix,
$ glxinfo | grep vendor
server glx vendor string: NVIDIA Corporation
client glx vendor string: NVIDIA Corporation
OpenGL vendor string: NVIDIA Corporation
ヽ(´▽`)ノワーイ
独創アプリ開発日記 216日目 Ubuntu18.04LTSにSteamインストール
超絶苦労しました。200行近くのコマンドを使わないとインストールすることが出来ませんでした。
いや違いました2行でインストール出来ました。
$ sudo add-apt-repository multiverse
$ sudo apt install steam
あとは、出現したSteamのアイコンをクリックして起動後、初回のダウンロードがちょっと時間がかかりましたが、既存のIDでログインしてFactorioがプレイできました。セーブデータは何もしなくてもWindowsでプレイしていたデータが読み込めました。「設定」の「インターフェイス」から日本語に設定すれば、ちゃんと日本語版がプレイ出来ました。
Windowsいらないじゃん!
•ू(ᵒ̴̶̷ωᵒ̴̶̷*•ू) )੭ु⁾ もきゅ~
その他、WindowsとUbuntuを交互に行き来すると時間がずれる対策として、以下のコマンドを実行しました。
sudo timedatectl set-local-rtc 1
また、起動直後にNumLockがONになるよう、以下のコマンドを実行しました。
$ sudo apt update
$ sudo apt install numlockx
$ gnome-session-properties
「自動起動するアプリケーションの設定」画面が出るので、
名前 : NumLock
コマンド:numlockx on
を追加しました。
あと、Ubuntuの言語は日本語にしましたが、ホームディレクトリ内の日本語ディレクトリは英語のままにしたかったため、以下のコマンドを実行しました。
$ LANG=C xdg-user-dirs-gtk-update
表示された画面で「Update Names」をクリックしました。
このブログの今日の投稿はUbuntuのFirefoxから書きました。
Windowsいらないじゃん!
•ू(ᵒ̴̶̷ωᵒ̴̶̷*•ू) )੭ु⁾ もきゅ~
•ू(ᵒ̴̶̷ωᵒ̴̶̷*•ू) )੭ु⁾ もきゅ~
•ू(ᵒ̴̶̷ωᵒ̴̶̷*•ू) )੭ु⁾ もきゅ~
独創アプリ開発日記 215日目 USBメモリにUbuntu18.04LTSインストール(成功)
今回は昨日のエラーを対処し、無事USBメモリ(3.0)にUbuntuを入れることができました。快適。
事前に「GParted」でEFIシステムパーティション (EFI system partition; ESP)を作っておき、無事インストール出来ました。
具体的には「GParted」で、ESPを作成するUSBメモリ(中身空っぽ)を右上のボタンで選択後、「Device」メニューを開き、「Create Partition Table」をクリック、「gpt」を選択し「Apply」ボタンをクリックします。 次にパーティション作成ボタンをクリックし、
New size:200
Partition name:ESP
File system:fat32
Label:ESP
として「Add」ボタンをクリック、「適用」ボタンをクリックします。
そして作成したESPに対して「Partition」メニューを開き、「Manage Flags」をクリック、「boot」と「esp」にチェックを入れ「Close」ボタンをクリックします。
以上でESPの作成は完了です。
あとは、ESP以外の領域へUbuntu用に「ext4」形式などのパーティションを作成し、そこへUbuntuのインストーラからセットアップを行えばOKです。その際、必ず「インストールの種類」画面で「それ以外」を選択し、「ブートローダをインストールするデバイス:」にUSBメモリーを指定します。
インストール直後のOpenGLバージョンを出力した結果は以下のとおりです。
$ glxinfo | grep "version"
server glx version string: 1.4
client glx version string: 1.4
GLX version: 1.4
    Max core profile version: 4.3
    Max compat profile version: 3.0
    Max GLES1 profile version: 1.1
    Max GLES[23] profile version: 3.1
OpenGL core profile version string: 4.3 (Core Profile) Mesa 18.0.0-rc5
OpenGL core profile shading language version string: 4.30
OpenGL version string: 3.0 Mesa 18.0.0-rc5
OpenGL shading language version string: 1.30
OpenGL ES profile version string: OpenGL ES 3.1 Mesa 18.0.0-rc5
OpenGL ES profile shading language version string: OpenGL ES GLSL ES 3.10
「ソフトウェアの更新」を行ったあとは以下の通りになりました。
$ glxinfo | grep "version"
server glx version string: 1.4
client glx version string: 1.4
GLX version: 1.4
    Max core profile version: 3.3
    Max compat profile version: 3.0
    Max GLES1 profile version: 1.1
    Max GLES[23] profile version: 3.0
OpenGL core profile version string: 3.3 (Core Profile) Mesa 18.0.0-rc5
OpenGL core profile shading language version string: 3.30
OpenGL version string: 3.0 Mesa 18.0.0-rc5
OpenGL shading language version string: 1.30
OpenGL ES profile version string: OpenGL ES 3.0 Mesa 18.0.0-rc5
OpenGL ES profile shading language version string: OpenGL ES GLSL ES 3.00
(σ´Д`) あれ?
独創アプリ開発日記 214日目 USBメモリにUbuntu18.04LTSインストール(失敗)
8GBのUSB(2.0)にUbuntuのISOを書き込んで、そのUSB(2.0)から、128GBの新しく買ったUSB(3.0)にインストール予定でした。
インストールの途中に
“grub-efi-amd64-signedパッケージを/target/にインストールするのに失敗しました”
と表示されてインストール出来ませんでした。
ここら辺のページに解決策がありそうなので、明日確認したいと思います。

